Navigation
The ability to navigate is a must. I am a proponent of the traditional map and compass method. On the map locate islands, peninsulas, escarpments, campsites, and portages. As you travel you will learn to keep your head up and look for these landmarks and be more aware of your surroundings, location, and weather conditions. When you navigate electronically you have a tendency to watch your device.
- Map and Compass
- Compass Bearing
- Map to Compass
- Navigate without a map or compass
- Using the Stars
- Telling time
- Estimating Sunset
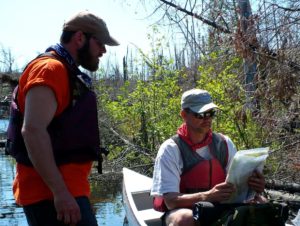
Map and Compass
A good map is essential. Without one you truly will be lost. Finding your way can sometimes be difficult even with one. Some of the lakes with islands, peninsulas, and bays can be challenging. The maps I have used are the Fisher and the McKenzie. I find the Fisher maps are easier to read the portages and campsites, whereas the McKenzie maps show the topography better. You can also go online to voyageurmaps.com they have interactive maps that can help you in planning your trip.
The next item you will need is a compass. We are talking about magnetic compasses. You will want one that is reliable. The bubble style, clip-on, knife hilt mounted, or combination compass, whistle, and thermometer won’t make it. It should have a clear base, rotating bezel, and orienting lines.
Compass Bearing
To establish a bearing hold the compass level in front of you and point the bearing (direction of travel) arrow in the direction you wish to go. Now turn the bezel so the red base arrow lines up with the red magnetic arrow. Your bearing, in degrees, will be the number on the bezel that lines up with the bearing arrow.
Once you have established your bearing it is best to plot a landmark in your direction of travel and work towards it. If you lose sight of the landmark use the compass. Hold the compass in front of you and ROTATE YOUR BODY until the red magnetic needle lines up with the red arrow on the base of the bezel. DO NOT twist the bezel. The bearing arrow is now pointing in the direction you will want to go. Pick a landmark on the horizon or the other side of the lake that line up with the bearing arrow. Walk or paddle to this point and repeat the process.
Map to Compass
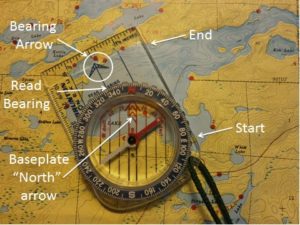
The next thing to learn is how to transfer a bearing (direction of travel) from a map (map to compass).
- Plot or visualize your starting and destination points on a map.
- Place the compass on the map and line up one of the side edges of your compass baseplate with this line of travel.
- Be sure your “bearing arrow” on the baseplate is pointing in the direction of travel.
- Hold the baseplate and rotate the bezel so the red “North” arrow on the base of the bezel lines up with the north/south lines on the map.
- Your bearing, in degrees, will be the number on the bezel that lines up with the bearing arrow.
To follow this bearing, take the compass off the map. Hold the compass in your palm in front of you with the base plate level and the bearing arrow pointing away from you. Rotate your body until the red magnetic needle lines up with the red north arrow on the base of the bezel. The bearing arrow is now pointing in the direction you will want to go. Pick a landmark on the horizon or the other side of the lake that line up with the bearing arrow. Walk or paddle to this point and repeat the process.
Navigate without a map or compass
How to navigate without a map or compass is a survival skill you should practice. There are various scenarios that could happen that would leave you without either.
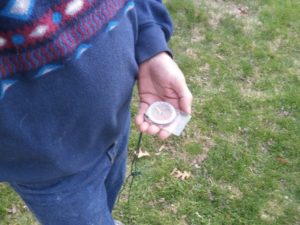
You first need to orient yourself. There are numerous ways to do this. You can use an ordinary dial watch as a compass. If all you have is a digital watch, it can still be done by laying out a watch face on the ground. Or you can use a shadow stick to determine east and west. You can even use vegetation to determine direction.
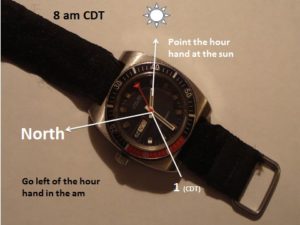
For ordinary dial watches:
- Take off your watch and lay it on a flat surface.
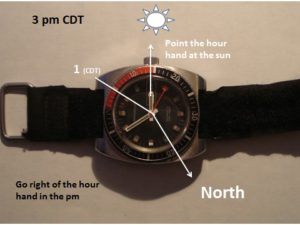
- Point the hour hand at the sun. In the summer, during daylight savings time (CDT), you will use the 1 o’clock position as a reference; in the winter, during standard time (CST), you will use the 12 o’clock position as a reference.
- North can be found halfway between the hour hand and the 1 or 12 o’clock positions.
- Go left (counterclockwise) of the hour hand in the a.m.; go right (clockwise) of the hour hand in the p.m.
- Determine your direction of travel and establish a landmark.
- Put your watch back on.
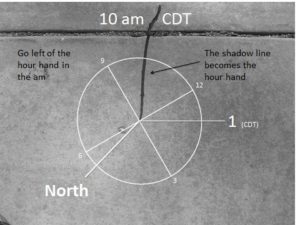
For digital watches:
- Clear an area on the ground.
- Poke a stick upright in the ground.
- Locate the tip of the stick’s shadow and use it as the center of the clock face.
- Draw or imagine a clock face.
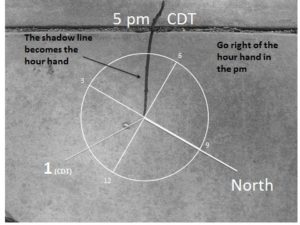
- Use the shadow line as the hour hand.
- Locate the 1 (CDT) or 12 (CST) o’clock position.
- North can be found halfway between the hour hand and the 1 or 12 o’clock positions.
- Go left (counterclockwise) of the hour hand in the a.m.; go right (clockwise) of the hour hand in the pm.
- Determine your direction of travel and establish a landmark.
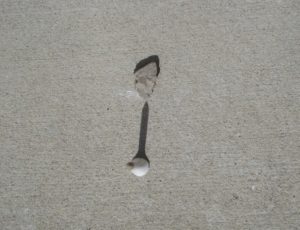
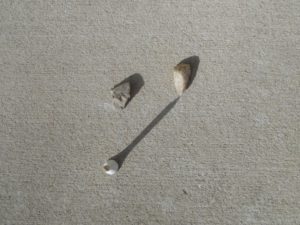
If you have no watch, use a shadow stick to determine an east-west line.
- Clear an area on the ground.
- Poke a stick upright in the ground.
- Place another stick or a pebble at the tip of the shadow.
- Repeat placing a stick or pebble at the tip of the shadow every twenty to thirty minutes.
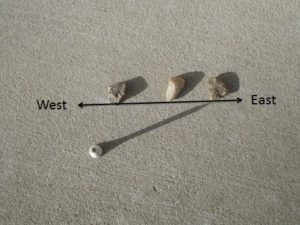
- The sticks or pebbles will form an east/west line.
- Remember the sun is southerly. Therefore, with the shadow pointing away from you, west will be to your left.
- Determine your direction of travel and establish a landmark.
Using the Stars
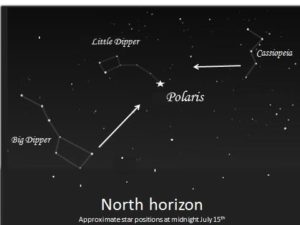
As night falls there are more ways to get your bearings. Sunsets are westerly, sunrises easterly. By far the best way to re-establish your bearings is by the stars, primarily the North Star (Polaris). To locate Polaris, find the Big Dipper (Ursa Major), the Little Dipper (Ursa Minor), or Cassiopeia. From the Big Dipper locate the two stars that make up the ladle end of the constellation. Draw a line through these stars and out about five times the depth of the ladle to Polaris. From the Little Dipper follow the handle to the last star, which is Polaris.
Cassiopeia is on the opposite side of Polaris than the Big Dipper. In the summer the Big Dipper is easier to find in the evening, but in the early morning hours it may be hidden by the horizon. By identifying Cassiopeia, you can then locate Polaris. Cassiopeia will look like a 3 when rising and an M when overhead. If you draw a line that bisects the bottom valley of the 3 or the right side valley of the M, that line will point toward Polaris.
Telling time
So you have a compass but no watch. How can you tell time? Easy, use a stick or your paddle as a sundial. Here is how you can estimate the time of day.
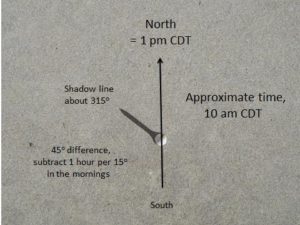
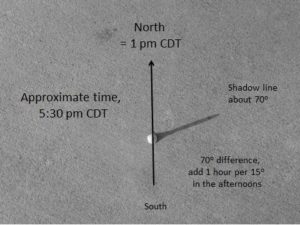
Draw a line on the ground that runs north and south. Place a stick at the south end of the line. Use your compass to determine how many degrees east or west of north the shadow falls. Each hour will equal 15o (360o ÷ 24 hrs. = 15o/hr.). North (360o) will be 1 pm CDT during the summer. If the shadow falls at 315o it is a 45o difference. Subtract 1 hour for every 15o in the mornings. 1 pm minus 3 hours equals 10 am. If the shadow falls at 70o it is a 70o difference. Add 1 hour for every 15o in the evenings. 1 pm plus 4 ½ hours equals 5:30 pm.
You can use the same procedure while on the water. Face the bow of your canoe north. The stern paddler holds their paddle vertical. Estimate the degrees the shadow falls east or west of the bow. 15o equal 1 hour. Estimate the time.
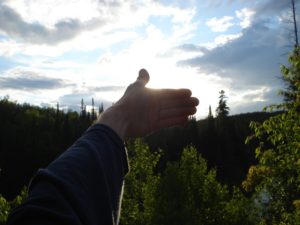
Estimating Sunset
Another quick trick is estimating the time to sunset. While holding your hand at arm’s length estimate how many horizontal fingers there are between the horizon and the sun. Each finger equals about 15 minutes. Four fingers to sunset = 1 hour. Six fingers = 1 ½ hours.