Meals
Planning your meals is just that, planning. You want to carry enough food to sustain yourself and your group for the duration of your trip. You do not want to go hungry. On the flip side, you do not want to carry more food than you will need. Everyone’s appetite is different. Consider that you may be burning more calories per day than you are used to and your appetite will increase.
- Food Sources
- Menu Suggestions
- Cookware
- Cooking
- Recipes

Food Sources
- Subsistence hunting and fishing
- Freeze dried/dehydrated meals
- Store bought
- Fresh/frozen foods
Subsistence hunting and fishing
In the old days this is how wilderness camping was done. Those days have passed. Hunting is out of season for most of the prime camping season. Fishing is in season and many still take advantage of the opportunity to catch fresh fish. Just don’t plan on it. I have yet to meet a fisherman who can guarantee fresh fish on any lake on any given day. That is not to say that if you fish you may be rewarded with a delicious fish dinner, just don’t count on it as one of your meals. Even if you catch fish it may not be enough to feed everyone. Use it as a substitute for all or part of one of your planned meals.
Freeze dried/dehydrated meals
This is the quick and easy way of providing meals for your wilderness trip. Each member of your party can choose their own meals. But it comes at a price. Meals are available from breakfast through to dessert. There is a wide variety and most sporting goods stores carry them. The stores geared to camping will have a larger selection.
Store bought
There is a variety of meals and products that will work in your wilderness menu that are available at your local grocery store. Generally the larger the store the bigger the selection will be. Shop around and see who has the best selection. Be sure and read the instructions to determine if it is practical to prepare in the wilderness.
Ready to eat – Do to our hurry up society there is a pretty big selection of quick meals designed for microwaves. These meals come in a microwaveable package; this means no metal or glass. Hormel offers a variety of beef, chicken, and turkey dishes over potatoes, dumplings, and noodles. Barilla offers pasta options. And Dinty Moore is still putting out the beef stew. Most come in a single serving size.
Box dinners – Other packaged meals such as Hamburger Helper, Chicken Helper, or Tuna Helper can be used. They come in a wide variety of flavors. Ground beef can be substituted with dried beef or cut up sausage. Chicken and tuna are readily available in soft packaging.
Rice – You will have a large variety of rice and flavorings to choose from. It is a one pot meal that you can add a variety of meats and vegetables to. My favorite is Zatarain’s, but Uncle Ben’s, Rice-a-Roni, and many store brands will work. Read the package and be sure that it does not require pan frying.
Pastas – Pastas are another great choice. They pack easily and come in a variety of styles. Spaghetti, linguini, and egg noodles are the ones we use the most. They can be topped with many sauces, meats and gravies. Ramen Noodles can be used for a quick hot lunch or as a backup meal.
Potatoes – Instant mashed potatoes are quick and easy. You can add many different gravies, meats, or vegetables to them. They come in single serving packs or in bulk boxes. If you buy in bulk you will have to repack to plastic bags, the cardboard boxes that they come in are not waterproof.
Soups – Knorr, Lipton, and many store brands offer soup packets, just add water. They come in a wide variety including beef, chicken noodle, split pea, vegetable, and potato. Once again a variety of meats and vegetables can be added to make a heartier meal. For thicker soups use less water.
Vegetables – Libby makes precooked, vacuum sealed, vegetable packs that require no refrigeration. You can choose from corn, peas, beans, carrots, and mixed vegetables. Though a little bulkier they are a lot cheaper and easier to prepare than dehydrated vegetables.
Gravies – There are a variety of gravies that can be used in recipes. Each packet generally makes one cup of gravy. Pick your flavor and add water.
Sauces – Sauces are a little harder. They may require other ingredients like tomato paste or butter. Tomato paste can be made from tomato powder or repackaged from cans. Another option is to find tomato/marinara sauce in a soft pack (Pomi, Hunts). It’s bulkier so eat it sooner in your trip. Alfredo sauce is also very good but it takes longer to cook and requires constant stirring to keep it from burning.
Meats – Meats can be added to any number of recipes. To find ones suitable for packing in to the wilderness go to the “Canned Meat” aisle of your grocery store. Remember no glass or metal is allowed so find ones that are in soft packaging. You should find tuna (Sunkist, 2.6 and 6.4 oz.), chicken (Tyson, 7 oz.), ham (Spam slice, 2.5 oz.), or dried beef (Armour, 4.5 oz.).
Sausages are another option. Sausage keeps better than the other meats and will generally be good for days after opening.
Fruits, nuts, beans – These are a good lightweight addition to many of your meals. Dried fruits and/or nuts can be added to your oatmeal, cereal, and trail mix. Beans are a good protein source that can be added to your dishes instead of meats.
Fresh/frozen
Fresh or frozen food can be taken along but requires extra care. We have had brats, chicken breasts, and pork chops grilled over the campfire. It is usually best to cook these on your first night.
Another option is to precook and freeze some of your meats. We have done this with beef tips, diced chicken, and spaghetti, burrito or fajita meats. Raw meats take too long to cook on a camp stove and therefore use up too much fuel. Precooked meats only need to be warmed up. The problem with bringing these meats is leakage and spoilage. To prevent leakage freeze the meat in a plastic bag, wrap the bag in newspaper, and place it in another plastic bag and refreeze it. Keep frozen until the start of your trip, unless you plan on eating it the first night.
Preventing spoilage is not as easy. The best we have found is to keep the frozen meat protected deep in the food pack or in a cooler. A frozen meat pack will take one day to thaw. Two days if it is in a cooler. Three days if you pack it in dry ice. You may be able to stretch this an additional day in cooler weather. Keep this pack/cooler out of the sun as much as possible. In the morning remove your evening meal from the cooler and allow it to thaw in the food pack throughout the day.
Beef tips and mushrooms over egg noodles with peas

Menu Suggestions
- Breakfast
- Lunch
- Snacks
- Appetizers
- Supper
Breakfast
- Sweet rolls (first morning)
- Instant oatmeal
- Dried fruit
- Cereal or granola with dry milk
- Powdered (instant) breakfast mixed with dry milk
- Dehydrated breakfast packet(s)
- Breakfast bars
- Pop Tarts
- Pancakes and syrup
Lunch
- Packaged soups.
- Dehydrated soups, chilis, and stews.
- Sausage and cheese.
- Thin buns, pita pockets, or tortillas with;
- Ham Salad – dice a Spam slice and mixed it with a packet of mayonnaise.
- Chicken salad – mix chicken (Tyson, 7 oz.) with two packets of mayo, serves two.
- tuna salad – Prepackaged tuna salad (Sunkist, 2.6 oz.) or tuna (Sunkist, 2.6) with one packet of mayo, serves one or (Sunkist 6.4 oz.) with two packets of mayo, serves two.
- Ham sandwich, Spam slice with a packet of brown mustard.
- Peanut butter and jelly.
Snacks
The following can be used as “on the go” lunches or as snacks.
- Trail mix
- Dried fruit
- Granola/fruit/energy bars
- Candy bars
- Sunflower seeds
- Beef jerky/sticks.
- String cheese
Appetizers
- Sausage – Cut up and serve as needed.
- Cheese block – Cut up and serve as needed.
- Crackers – Keep in protected area of pack. Serve with above
- Cocktail bread – Rye, pumpernickel, or sour dough. Great with any of the below dips or spread.
- Pita bread cut up for dipping – Great with any of the below dips.
- Humus/guacamole/vegie dip – Keep in protected area of pack.
- Cheese spread – Keep in protected area of pack.
Suppers
By campfire
Meats
- Hamburgers
- Bratwurst
- Boneless chicken breast
- Boneless pork chops
- Boneless steak
- Fresh fish fried in a skillet, breaded and/or seasoned, in a little oil or water.
Vegetables
- Baked potatoes
- Corn on the cob
Foil packs
- Any vegetables with water.
- Diced potatoes with oil/water and seasoning.
- Diced sausage, Spam, chicken or dried beef, with diced potatoes, and any vegetable. Add seasoning and oil/water.
- Fresh fish with seasoning and water.
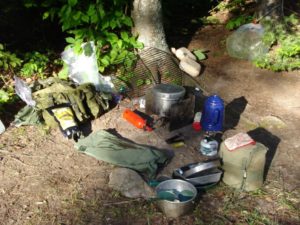
Cookware
- Pots/Pans\
- Mess Kits
- Utensils
Pots/Pans
Your menu selection will determine what you will need for cooking. Unless you decided on all dehydrated meals, you will need a pot or two. The size of the pot(s) will be dependent on the size of your group.
Any pot or pots that fit inside each other will do. If it has a long handle, cut it off. Pots with long handles do not pack well or sit well on a camp stove. These pots can be purchased at any second-hand stores.
Another item you may need is a skillet. Frying food tends to waste fuel so this type of cooking should be minimized. The skillet can also be used to make desserts. Pan breads and muffins can be baked by using the skillet. Unlike the pot(s), leave the handle attached.
Cook Area
Mess Kits
There are many options available. You can purchase a cookware set that comes with mess kits nestled inside. You can use an old military surplus or Boy Scout kit. Any metal or durable plastic deep dish will work as a plate or a bowl. Even a metal pie tin can be used.
You will also need a cup for drinking. Enamel cups are nice but some tend to conduct the heat of the beverage and can be hot to hold. Plastic or stainless steel travel mugs work great. Plastic camp cups are lightweight, durable, and inexpensive.
Your eating utensils should include a fork and spoon. Knives usually are not needed for most meals. A combination fork, spoon, and knife (Spork) works nice and is cheap.

Utensils
The following is a list of utensils and possible uses. You will not need all of them for your trip. Your menu will determine which ones to take along.
- Measuring cup – A must for adding measured water to your recipes. It also doubles as a ladle.
- Large spoon – Needed for stirring and serving meals.
- Knife with scabbard – Needed for slicing sausages, cheese, or any other bulk food you may bring. I like to keep the food knife separate from any camp or filet knife to prevent contamination.
- Spatula – Needed if you fry fish or bake desserts.
- Pasta spoon – Nice for pasta or rice cooking. It also can be used as a serving spoon.
- Ladle – It is nice for serving soups and stews. The measuring cup will do the same.
- Tongs – Nice when your menu includes fresh meats or vegetables cooked over or in the campfire.
- Cutting board – Nice for preparing meats or appetizers. We use a small, square one that fits inside the nine-inch bake pan.
Cooking
You will need a camp stove. If you assume you will be cooking over a campfire every night, you will be disappointed. Open-fire cooking is always a treat, but not one to depend on. There are numerous sizes and styles of stoves from which to choose. A one-burner stove is usually adequate. If you are setting up a base camp, have a large group, or are into cooking, a two-burner is an option.
The most popular stoves will use a canister of propane or propane/butane mix. The propane/butane mix canisters are eight ounces and usually available at select sporting goods stores.
A better option than the disposable fuel canisters is to invest in a stove that uses refillable fuel cells. When you opt for this type of stove, your fuel costs drop considerably.
- Camp Stove
- Grill
- Baking

Camp Stove
Anytime you are cooking with a camp stove you will want to use as little fuel as possible. Following these directions will help you prepare your meals and conserve your fuel.
- Protect your stove and pots from the wind.
- When the stove is not in use turn it off.
- Pots with lids will cook faster.
- Pots are not very stable on top of a camp stove. Keep a close eye on them.
- Anytime you are stirring or adding ingredients take the pot off the stove and place it on a firm surface.
- Gravies should be mixed in the measured amount of cold water before adding to the pot.
- For most of your rice and soup recipes the added ingredients can be placed in the water, or water/rice/gravy mix, and warmed as the water is coming to a boil.
- When a recipe tells you to simmer you should bring it to a boil, cover it, and remove it from the heat. Let it sit. Simmering uses too much fuel. The dish will cook fine in the hot liquid it is in. Stir and reheat to boil every 5-10 minutes until done.
- When cooking pasta bring water to a boil, add pasta and return to boil. Remove from heat and stir thoroughly, cover and sit 10-15 minutes. Check for doneness, drain and serve.
- Sauces and some meats will have to be warmed in a separate pot.
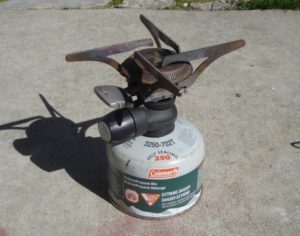

Mixed gas canister stove Refillable, reusable fuel cell stove
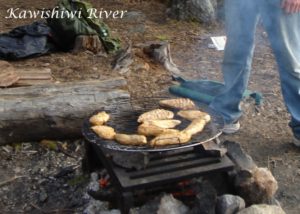
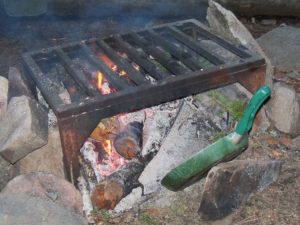
Grill
It is best to cook over hot embers rather than an open flame. Establish a fire that has a good bed of hot embers. You may want to bring in your own grate to place over the top of the USFS grate. Heavy duty aluminum foil will also work. Fresh fish, hamburgers, brats, chicken breasts, pork chops, and steaks are some of your options. Bring in only boneless meats and you won’t have to worry about packing out the bones.
Cooking fresh meats over the fire does present a number of problems. First, you have to deal with the meat itself, keeping it fresh and preventing leakage in your pack. Second, the drippings will contaminate your campfire and attract unwanted visitors.
Baking
If you decided to try to bake bread, biscuits, or dessert recipes over a campfire here are a few suggestions.
For pan (bannock) bread and some desserts you can use a skillet. Place the batter in a lightly oiled skillet. Place it over the fire and allow it to firm up on both sides. Now place the skillet on its edge at the front of the fire so it catches the radiant heat. Rotate and flip until it is done. You will need a rock to support the skillet and may need a stone to keep the bread/dessert from sliding.
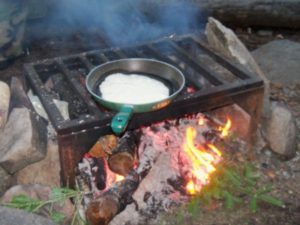
Pan Bread
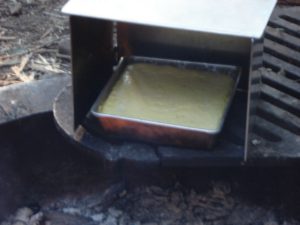
You can also bake using a reflector oven. Get a nice fire with a good bed of hot embers. Place the oven slightly above and to the side of the fire. Place the batter or dough in a lightly oiled 9”x9” baking pan. Place the pan in the oven and rotate the pan every 5-10 minutes. Anytime you are baking over fire, vigilance and patience are required.
Box reflector oven
Recipes
- Rice dishes
- Pastas
- Mashed potatoes
- Tortillas
- Soup/Stew
- Box dinners
- Desserts
- Baked goods
- Rice dishes
You will have a large variety of rice and flavorings from which to choose. It is a one-pot meal that you can add a variety of meats and vegetables.
- Jambalaya with sausage – One 8 oz. box jambalaya mix, 12-14 ounces chorizo or Andouille sausage:
Add 2 ½ cups of water to a pot. Add rice mix, cut up meat, and a dash of oil. Heat to boil. Remove from heat and stir, cover and let sit. Reheat and stir every 5-10 minutes until done, 30-40 min. Serves 3.
- Chicken and rice – One 6 oz. box Uncle Ben’s Original rice, 7 oz. Tyson chicken packet or 8 oz. precooked diced chicken:
Add 2 cups of water to a pot. Add seasoning packet, rice mix, meat and a dash of oil. Heat to boil. Remove from heat and stir, cover and let sit. Reheat and stir every 5-10 minutes until done, 30-40 min. Serves 2.
Note: The precooked chicken can be made by sautéing diced chicken in butter or by baking chicken breasts and dicing when cooled. Freeze until needed.
- Sausage and rice – One cup white, brown, or long grain rice, 8 oz. summer sausage, 2 packets brown or home-style gravy:
Add 2 ½ cups water and gravy to a plastic bag, mix. Pour in a pot and add rice mix, cut up sausage, and a dash of oil. Heat to boil. Remove from heat and stir, cover and let sit. Reheat and stir every 5-10 minutes until done, 30-40 min. Serves 2.
- Stir Fry – One cup white, brown, or long grain rice, 8 oz. precooked stir fry of your choice:
Add 2 ½ cups of water and rice in a pot with a dash of oil. Heat to boil. Remove from heat and stir, cover and let sit. Reheat and stir every 5-10 minutes until done, 30-40 min. Place precooked stir fry in a separate pot. As the stove becomes available warm up the mixture. Alternate pots until both are done. Serves 2.
- As a side – ½ cup dry rice of your choosing:
Add 1 ¼ cup water and rice to a pot with a dash of oil. Heat to boil. Remove from heat and stir, cover and let sit. Reheat and stir every 5- 10 minutes until done, 30-40 min. Serves 2.
Pastas
Pastas are a great choice. They pack easily and come in a variety of styles.
- Italian sausage in marinara – 8 oz. precooked mild Italian sausage, 8 oz. spaghetti or linguini noodles, 16 oz. of sauce in soft side package (Poma, Hunts), or 6 oz. tomato paste repackaged to a plastic bag, 1 packet spaghetti sauce mix, 4 oz. parmesan cheese or fresh mozzarella:
Mix in 1 packet of sauce mix to tomato sauce or make sauce by adding 1 ½ cups water to tomato paste. Mix thoroughly in plastic bag. Add mixture to a pot and add meat, bring to a boil. Remove from heat and stir, cover and let sit. Reheat and stir every 5- 10 minutes until warmed through. In another pot bring 2 quarts of water to a boil. Add noodles and return to boil. Remove from heat and stir, cover and let sit until al dente, drain and serve. Serve meat sauce over noodles topped with cheese. Serves 2.
- Chicken marinara – Same as above but substitute 7 oz. Tyson chicken packet or 8 oz. precooked diced chicken for the meat. Serves 2.
- Chicken Alfredo – Same as above but substitute Alfredo sauce for spaghetti sauce. Alfredo sauce is a little testier and requires simmering to thicken up and it will scorch if you are not stirring constantly. Serves 2.
- Beef tips over egg noodles – 8 oz. precooked beef tips with sliced mushrooms and brown gravy, 8 oz. egg noodles:
Bring 1-2 quarts of water to a boil. Add noodles and return to boil. Remove from heat and stir, cover and let sit until tender, drain and serve. Place precooked beef tips in a separate pot. As the stove becomes available warm up the mixture. Serve the meat sauce over egg noodles. Serves 2.
Note: To make the beef tips brown the diced beef in butter, mix packet of brown gravy mix in cold water then add to the beef, simmer until beef is tender, add 4 oz. cut up mushrooms and cook until soft. Freeze until needed.
- Chicken and gravy over egg noodles – Same as above but substitute 7 oz. Tyson chicken pack or 8 oz. precooked diced chicken and packet of chicken gravy mix for the meat, 8 oz. egg noodles: Serves 2.
- Salisbury Sausage – 6 oz. box Salisbury Hamburger Helper, ¼ cup dry milk, 8 oz. cut up summer sausage, 1 cup mixed vegetables:
Follow package directions but substitute sausage for ground beef. Add vegetables toward the end. Serves 2.
- Mac and Cheese Supreme – 7 oz. box of Mac n Cheese, 4 tsp dry milk, 4 tbsps butter or 2 tbsp oil, 6.4 oz. tuna packet, and 1 cup of peas:
Make the Mac n Cheese as directed on the box. Substitute dry milk for liquid milk by adding ¼ cup water to plastic bag containing the dry milk, mix. Add oil or butter. Add tuna and peas. Heat until warmed through. Serves 2.
- Mac and Cheese Royale –Same as above but substitute 8 oz. cut up summer sausage and 1 cup corn for the meat and vegetable. Serves 2.
- Mac and Cheese American – Same as above but substitute 4 cut up hot dogs and 1 cup green beans for the meat and vegetable. Serves 2.
Mashed potatoes
You can add many different gravies, meats, or vegetables to them.
- Chicken and gravy over mashed potatoes – 7 oz. Tyson chicken pack or 8 oz. precooked diced chicken, packet of chicken gravy mix, 2 cups dry instant mashed potato (to make 3 cups prepared), 3 Tbsp. butter or 1 ½ Tbsp. of oil, 2/3 cup dry milk (to make 1 cup of milk):
In a plastic bag add gravy mix to 1 cup of water, mix. Pour mix into a pot and add meat, bring to a boil. Remove from heat and stir, cover and let sit. Reheat and stir every 5- 10 minutes until thickened and warmed through. In a separate pot bring 2 cups of water and butter or oil to a boil, remove from heat. Add 1 cup water to bag containing dry milk, mix. Add milk mixture and dry potatoes to pot and mix. Serve meat and gravy over mashed potatoes. Add 1 cup of a vegetable to the mix if you wish. Serves 2.
- Beef or sausage and gravy over mashed potatoes – Same as above but substitute 8 oz. precooked beef, 8 oz. cut up sausage or 2 – 4.5 oz. packets of dried beef for the chicken. Substitute brown or home-style gravy for the chicken gravy. Serves 2.
Tortillas
- Beef burritos and rice – 8 oz. precooked burrito meat with seasoning, 4 – 8”or 10” tortillas, ½ cup dry rice of your choosing, 4 oz. grated cheese, 4 packets taco sauce from fast food joint:
Add 1 ¼ cup water and rice to a pot with a dash of oil. Heat to boil. Remove from heat and stir, cover and let sit. Reheat and stir every 5-10 minutes until done, 30-40 min. Place precooked burrito meat in a separate pot. As the stove becomes available warm up the mixture. Alternate pots until both are done. Wrap meat, cheese, sauce, and rice in a tortilla or the rice can be served on the side. Serves 2.
- Beef/Chicken Fajitas and rice – Same as above but substitute the meat with 8 oz. precooked fajita meat of your choosing and fajita seasoning. Omit the cheese if you wish. Serves 2.
Soup/Stew
Remember no cans, so you will want to purchase the soup mix packets. These soups can be prepared as directed or you can turn them into a heartier meal/stew by adding ingredients or adding less water. The below recipes are designed for the smaller soup packets that make 3-4 cups per packet. Serves 2.
- Chicken, chicken noodle – Add 7 oz. Tyson chicken pack or 6 oz. precooked diced chicken. Mix in a cup of carrots or corn.
- Beef – Add 6 oz. precooked beef, cut up sausage, or 4.5 oz. dried beef. Mix in a cup of peas.
- Pork – Add two 3 oz. cut up Spam slices, or 4 cut up hot dogs.
- Split pea – Add two 3 oz. cut up Spam slices, or 4 cut up hot dogs. Mix in a cup of carrots.
- Potato – Add two 3 oz. cut up Spam slices, or 4 cut up hot dogs.
- Vegetable – Have fun with this. Doesn’t have to be all vegetable. You can add any combination of the above ingredients or you can use up any leftovers.
To prepare the above add measured amount of water to a pot, add soup mix, meat, and a vegetable, heat to boil. Remove from heat and stir, cover and let sit. Reheat and stir every 5- 10 minutes until done, 20-30 min.
- Instant Mashed Potato Soup – Follow box directions for 2 cups (4 servings) of instant mashed potatoes. Place measured amount of water in a pot, add 1 c. diced Spam/ham/hot dog, 1 c. cooked carrots, 1 Tbsp. oil. Heat to a boil, allow meat and carrots to warm through, remove from heat. Add measured amount of instant mashed potatoes and 3x the milk the recipe calls for. Mix thoroughly. Serves 2.
Note: You can bake rolls, bannock or corn bread the night before and serve with the soups.
Box Dinners
Hamburger Helper, Chicken Helper, or Tuna Helper can be used. Ground beef can be substituted with precooked beef, dried beef or cut up sausage. Precooked diced chicken or Tyson chicken packets can be used in the chicken recipes and Sunkist tuna packets work in the tuna recipes. Follow package directions. Serves 3.
Desserts
Pudding – Chocolate, butterscotch, pistachio, etc. To pack – place the pudding mix packet in a plastic bag large enough to hold all the finished ingredients. Add small plastic bag with measured amount of dry milk to it.
To make – remove pudding packet from bag. Place dry milk with measured amount of water in the bag, mix. Add pudding mix to bag and continue mixing (squish it around in the bag). Set aside until ready to serve. You can eat it right out of the bag.
Baked Goods
For pan (bannock) bread and some desserts, you can use a skillet. Place the batter in a lightly oiled skillet. Place it over the fire and allow it to firm up on both sides. Now place the skillet on its edge at the front of the fire so it catches the radiant heat. Rotate and flip until it is done.
You can also bake using a reflector oven. Get a nice fire with a good bed of hot embers. Place the oven slightly above and to the side of the fire. Place the batter or dough in a lightly oiled nine-inch by nine-inch baking pan. Place the pan in the oven and rotate the pan every five to ten minutes. Anytime you are baking over fire, vigilance and patience are required.
Bannock (pan) bread – To pack; place in a plastic bag large enough to hold all finished ingredients; 1 cup flour, 1 tsp baking powder, ¼ tsp salt, (or substitute previous with 1 cup Bisquick), ¼ cup dry milk powder.
To mix; add 1 tbsp oil to bag and start adding water slowly (½ cup?) while mixing (squish it around in the bag). Add only enough water to make a stiff batter. Add batter to well-oiled bake pan or skillet. Serve with jelly, maple syrup, or honey or keep for tomorrow’s dinner.
Biscuits – To pack; place in a plastic bag large enough to hold all finished ingredients; 2 cups flour, 1 tbsp. baking powder, 1 tsp salt, (or substitute previous with 2 ¼ cup Bisquick), ¼ cup dry milk powder.
To mix; add 1 tbsp. oil to bag and start adding water slowly (2/3 cup?) while mixing (squish it around in the bag). Add enough water to make dough that will stand on its own. Add golf ball sized dollops of dough to oiled bake pan. Bake in a hot reflector oven until golden. Makes 9 (?) biscuits.
Corn bread – Find a corn bread mix that does not require eggs (Martha White). Package, prepare, and bake as described above. Serve with jelly, maple syrup, or honey. You can also make it as pan bread.
Muffin slab – Find a muffin mix that does not require eggs (Betty Crocker, Martha White). Package, prepare, and bake as described above.